'개발 > iOS Dev' 카테고리의 다른 글
| View Deck (0) | 2012.07.18 |
|---|---|
| 정말 감사한 블로그, 카페, 기타등등 (0) | 2012.07.12 |
| [iOS] JSON parser (0) | 2012.07.02 |
| [iOS] XML parser (0) | 2012.07.02 |
| [iOS] TableViewController를 UINavigationController와 함께 모달뷰로 띄우기 (0) | 2012.06.29 |
| View Deck (0) | 2012.07.18 |
|---|---|
| 정말 감사한 블로그, 카페, 기타등등 (0) | 2012.07.12 |
| [iOS] JSON parser (0) | 2012.07.02 |
| [iOS] XML parser (0) | 2012.07.02 |
| [iOS] TableViewController를 UINavigationController와 함께 모달뷰로 띄우기 (0) | 2012.06.29 |
파서가 필요한 이유
XML 문서는 단지 계층적 구조 형식의 문서이다.


| [php] 회원가입 (0) | 2015.07.15 |
|---|---|
| [워드프레스] 워드프레스 기반 안드로이드 앱 만들기 (0) | 2015.07.15 |
| [PHP] eclipse 개발 환경 (0) | 2014.10.14 |
| [java] jar 파일 exe 만들기 (0) | 2012.08.16 |
| 티스토리 블로그에 SyntaxHighlighter 3.0 적용하기 (0) | 2012.06.20 |
- Layout 기본 속성
android:layout_margin : 상하좌우 여분 공백
1. AbsoluteLayout 핵심 속성
android:layout_x : 부모 레이아웃 안에서의 x 좌표(Dimension) ex)100px
2. FrameLayout
android:foreground : 내용위에 겹쳐 그릴 표시물 자원
android:foregroundGravity : 전경 표시물의 중력
android:measureAllChildren : 레이아웃의 크기를 모든 자식을 고려해서 결정할 것인지 아니면 VISIBLE로 설정된 자식들만 고려할 것인지의 여부(true or false)
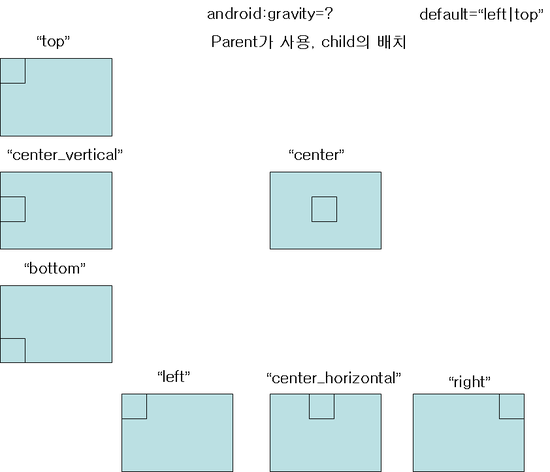
android:layout_gravity : 부모안의 자식뷰의 중력
중력 관련 값
| Constant | Value | Description |
|---|---|---|
top | 0x30 | Push object to the top of its container, not changing its size. |
bottom | 0x50 | Push object to the bottom of its container, not changing its size. |
left | 0x03 | Push object to the left of its container, not changing its size. |
right | 0x05 | Push object to the right of its container, not changing its size. |
center_vertical | 0x10 | Place object in the vertical center of its container, not changing its size. |
fill_vertical | 0x70 | Grow the vertical size of the object if needed so it completely fills its container. |
center_horizontal | 0x01 | Place object in the horizontal center of its container, not changing its size. |
fill_horizontal | 0x07 | Grow the horizontal size of the object if needed so it completely fills its container. |
center | 0x11 | Place the object in the center of its container in both the vertical and horizontal axis, not changing its size. |
fill | 0x77 | Grow the horizontal and vertical size of the object if needed so it completely fills its container. |
clip_vertical | 0x80 | Additional option that can be set to have the top and/or bottom edges of the child clipped to its container's bounds. The clip will be based on the vertical gravity: a top gravity will clip the bottom edge, a bottom gravity will clip the top edge, and neither will clip both edges. |
clip_horizontal | 0x08 | Additional option that can be set to have the left and/or right edges of the child clipped to its container's bounds. The clip will be based on the horizontal gravity: a left gravity will clip the right edge, a right gravity will clip the left edge, and neither will clip both edges. |
3. LinearLayout
android:orientation : 자식뷰들을 하나의 행(가로)으로 표시할지 열(세로)로 표시할지 결정 (horizontal, vertical)
android:gravity : 부모안의 자식뷰의 중력
android:layout_gravity : 특정 자식뷰의 중력
4. RelativeLayout
android:gravity : 부모안의 자식뷰의 중력
android:layout_alignWithParentIfMissing
android:layout_centerInParent : 부모뷰의 정중앙에 위치하도록 함(true, false)
android:layout_centerHorizontal : 부모뷰의 수평 중앙에 배치 (true, false)
android:layout_centerVertical : 부모뷰의 수직 중앙에 배치 (true, false)
android:layout_alignParentBottom : 부모뷰의 아래 위치 (true, false)
android:layout_alignParentLeft : 부모뷰의 왼쪽 위치 (true, false)
android:layout_alignParentRight : 부모뷰의 오른쪽 위치 (true, false)
android:layout_alignParentTop : 부모뷰의 상단 위치 (true, false)
android:layout_above : 뷰의 하단 가장자리를 대상뷰의 상단에 붙임(@id/abc)
android:layout_below : 뷰의 상단 가장자리를 대상뷰의 하단에 붙임(@id/abc)
android:layout_toLeftOf : 뷰의 오른쪽 가장자리를 대상뷰의 왼쪽에 붙임(@id/abc)
android:layout_toRightOf : 뷰의 왼쪽 가장자리를 대상뷰의 오른쪽에 붙임(@id/abc)
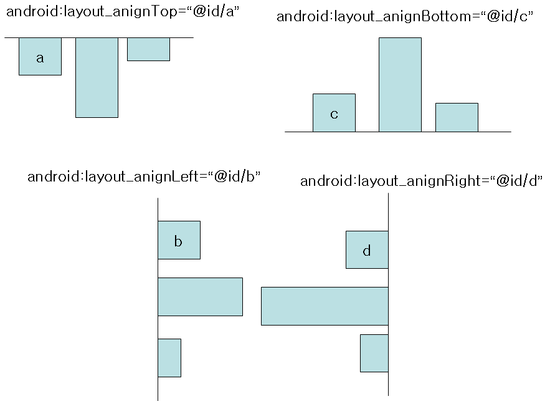
android:layout_alignTop : 뷰를 대상뷰의 상단 가장자리에 붙임(@id/abc)
android:layout_alignBottom : 뷰를 대상뷰의 하단 가장자리에 붙임(@id/abc)
android:layout_alignLeft : 뷰를 대상뷰의 왼쪽 가장자리에 붙임(@id/abc)
android:layout_alignRight : 뷰를 대상뷰의 오른쪽 가장자리에 붙임(@id/abc)
5. TableLayout
android:collapseColumns : 숨길 열들의 번호들을 쉼표로 분리해서 나열한 것(0기반)
android:shrinkColumns : 줄일 수 있는 열들의 번호들을 쉼표로 분리해서 나열한 것(0기반)
android:stretchColumns : 늘릴 수 있는 열들의 번호들을 쉼표로 분리해서 나열한 것(0기반)
android:layout_column : 이 뷰가 표시될 열 번호
android:layout_span : 이 뷰가 차지할 열들의 개수
<TableLayout
android:id="@+id/TableLayout01"
xmlns:android="http://schemas.android.com/apk/res/android"
android:layout_width="fill_parent"
android:layout_height="fill_parent"
android:stretchColumns="*" android:gravity="center_vertical">
<TableRow
android:id="@+id/TableRow01"
android:layout_width="fill_parent"
android:layout_height="fill_parent">
<Button
android:id="@+id/Button01"
android:text="1"></Button>
<Button
android:id="@+id/Button02"
android:text="2"></Button>
<Button
android:id="@+id/Button03"
android:text="3"></Button>
</TableRow>
<TableRow
android:id="@+id/TableRow02"
android:layout_height="wrap_content"
android:layout_width="fill_parent">
<Button
android:id="@+id/Button04"
android:text="4"></Button>
<Button
android:id="@+id/Button05"
android:text="5"></Button>
<Button
android:id="@+id/Button06"
android:text="6"></Button>
</TableRow>
<TableRow
android:id="@+id/TableRow02"
android:layout_height="wrap_content"
android:layout_width="fill_parent">
<Button
android:id="@+id/Button07"
android:text="7"></Button>
<Button
android:id="@+id/Button08"
android:text="8"></Button>
<Button
android:id="@+id/Button09"
android:text="9"></Button>
</TableRow>
<TableRow
android:id="@+id/TableRow02"
android:layout_height="wrap_content"
android:layout_width="fill_parent">
<Button
android:id="@+id/Button00"
android:text="0"
android:layout_column="1"></Button>
</TableRow>
</TableLayout>
출처 : http://blog.naver.com/dong277?Redirect=Log&logNo=130082743196
[출처] Android Layout별 속성 정리|작성자 동동
| [TabHost] 선택된 탭의 이미지 처리 (0) | 2012.07.13 |
|---|---|
| LayoutInflater 의 다양한 코드 (0) | 2012.07.13 |
| 안드로이드 기기별 해상도 & 치수 (0) | 2012.07.11 |
| 안드로이드 시스템 아이콘 (0) | 2012.07.10 |
| 안드로이드 라이브러리 (0) | 2012.07.10 |
안드로이드 파편화
http://thebetterday.tistory.com/2418
http://www.bloter.net/archives/110210
[안드로이드 해상도 관련]
디자이너와의 협업을 위한 몇가지 팁
http://theeye.pe.kr/entry/few-tips-for-android-programmer-and-ui-designer
기기별 해상도
http://blog.naver.com/PostView.nhn?blogId=kandroid&logNo=20172566283
안드로이드폰 기기별 DB (첨부 Exel File)
[안드로이드 치수 관련]
안드로이드 치수 정리 dpi, dp, dip, sp, pt, px, mm, in
화면 해상도에 관계없는 레이아웃(Layout) 만들기
| LayoutInflater 의 다양한 코드 (0) | 2012.07.13 |
|---|---|
| Android Layout별 속성 정리 (0) | 2012.07.11 |
| 안드로이드 시스템 아이콘 (0) | 2012.07.10 |
| 안드로이드 라이브러리 (0) | 2012.07.10 |
| [andriod] 전화걸기 (0) | 2012.07.03 |
| Android Layout별 속성 정리 (0) | 2012.07.11 |
|---|---|
| 안드로이드 기기별 해상도 & 치수 (0) | 2012.07.11 |
| 안드로이드 라이브러리 (0) | 2012.07.10 |
| [andriod] 전화걸기 (0) | 2012.07.03 |
| 2012 안드로이드 sdk & eclipse 설치(개발환경 셋팅) (0) | 2012.07.02 |
| Android Layout별 속성 정리 (0) | 2012.07.11 |
|---|---|
| 안드로이드 기기별 해상도 & 치수 (0) | 2012.07.11 |
| 안드로이드 시스템 아이콘 (0) | 2012.07.10 |
| [andriod] 전화걸기 (0) | 2012.07.03 |
| 2012 안드로이드 sdk & eclipse 설치(개발환경 셋팅) (0) | 2012.07.02 |
| 소켓 서버 예제 (0) | 2012.08.22 |
|---|---|
| 데이터그리드 column 안에 다른 콤포넌트 넣기 (0) | 2012.08.22 |
| 무료 플래시 게임 엔진들 (0) | 2012.06.22 |
| flash player debugger 다운로드 페이지 (0) | 2012.06.21 |
| youtube의 영상을 플래시로.. (0) | 2012.06.19 |
첫번째 버튼은 전화를 걸고,
두번째 버튼은 전화 어플로 번호만 넘긴다.
전화가 걸리게 하기 위해선 권한을 추가해 줘야 한다.
1. Manifest.xml에 추가
2. MainActivity.java
package com.ahikuya.phone;
import android.os.Bundle;
import android.annotation.SuppressLint;
import android.app.Activity;
import android.view.Menu;
import android.view.MenuItem;
import android.support.v4.app.NavUtils;

import android.view.View;
import android.view.View.OnClickListener;
import android.widget.Button;
import android.content.Intent;
import android.net.Uri;


@SuppressLint("ParserError")
public class MainActivity extends Activity implements OnClickListener {

    @Override
    public void onCreate(Bundle savedInstanceState) {
        super.onCreate(savedInstanceState);
        setContentView(R.layout.activity_main);


        Button bt1 = (Button)findViewById(R.id.button1);
        bt1.setText("바로 전화 걸기");

        Button bt2 = (Button)findViewById(R.id.button2);
        bt2.setText("다이얼로 표시");

        bt1.setOnClickListener(this);
        bt2.setOnClickListener(this);
    }


    public void onClick(View arg0)
    {
    	switch(arg0.getId())
    	{
    	case R.id.button1:
    		startActivity(new Intent("android.intent.action.CALL", Uri.parse("tel:010-1111-2222")));
    		break;
    	case R.id.button2:
    		startActivity(new Intent("android.intent.action.DIAL", Uri.parse("tel:010-222-3333")));
    		break;
    	}
    }

    @Override
    public boolean onCreateOptionsMenu(Menu menu) {
        getMenuInflater().inflate(R.menu.activity_main, menu);
        return true;
    }
}
2. MainActivity.xml
| Android Layout별 속성 정리 (0) | 2012.07.11 |
|---|---|
| 안드로이드 기기별 해상도 & 치수 (0) | 2012.07.11 |
| 안드로이드 시스템 아이콘 (0) | 2012.07.10 |
| 안드로이드 라이브러리 (0) | 2012.07.10 |
| 2012 안드로이드 sdk & eclipse 설치(개발환경 셋팅) (0) | 2012.07.02 |
| Android Layout별 속성 정리 (0) | 2012.07.11 |
|---|---|
| 안드로이드 기기별 해상도 & 치수 (0) | 2012.07.11 |
| 안드로이드 시스템 아이콘 (0) | 2012.07.10 |
| 안드로이드 라이브러리 (0) | 2012.07.10 |
| [andriod] 전화걸기 (0) | 2012.07.03 |
다운 : https://github.com/johnezang/JSONKit
사용방법 참고 : http://www.thezeto.com/wordpress/?p=14
참고 자료 : http://psionides.eu/2010/12/12/cocoa-json-parsing-libraries-part-2/
[usage]
    NSString *jsonUrl = @"http://twitter.com/statuses/public_timeline.json";
    NSData *jsonData = [NSData dataWithContentsOfURL:[NSURL URLWithString:jsonUrl]];

    //NSLog(@"jsonData : %@", [jsonData objectFromJSONData]);
    NSArray *items = [jsonData objectFromJSONData];
    NSLog(@"jsonData >> class : %@, count : %d", [items class], [items count]);
    //NSLog(@"jsonData >> %@", [items objectAtIndex:0]);

    // Array에서 Dictionary 가져오기
    NSDictionary *dic = [items objectAtIndex:0];
    NSLog(@"dic created_at:%@", [[dic valueForKey:@"created_at"] description]);
| 정말 감사한 블로그, 카페, 기타등등 (0) | 2012.07.12 |
|---|---|
| [아이폰어플]UIImageView에 원격이미지 비동기 로드 및 캐쉬 기능 넣기 (0) | 2012.07.12 |
| [iOS] XML parser (0) | 2012.07.02 |
| [iOS] TableViewController를 UINavigationController와 함께 모달뷰로 띄우기 (0) | 2012.06.29 |
| 아이폰 앱을 앱스토어 통하지 않고 배포하는 방법 (0) | 2012.06.28 |