'개발 > 안드로이드' 카테고리의 다른 글
| ExpandableListView 사용 (0) | 2013.01.04 |
|---|---|
| sliding menu(facebook menu style) (0) | 2012.12.20 |
| [안드로이드] Android Custom ListView with CheckBox (0) | 2012.08.17 |
| [android] Custom EventListener 만드는 방법 (0) | 2012.07.24 |
| apk tool (0) | 2012.07.20 |
| ExpandableListView 사용 (0) | 2013.01.04 |
|---|---|
| sliding menu(facebook menu style) (0) | 2012.12.20 |
| [안드로이드] Android Custom ListView with CheckBox (0) | 2012.08.17 |
| [android] Custom EventListener 만드는 방법 (0) | 2012.07.24 |
| apk tool (0) | 2012.07.20 |
참고 : http://nalsil.tistory.com/entry/Android-Custom-ListView-with-CheckBox
http://www.heikkitoivonen.net/blog/2009/02/15/multicolumn-listview-in-android/
http://hashfold.com/techfold/android-creating-multi-column-layout-with-arrayadapter/
http://blog.naver.com/PostView.nhn?blogId=yhr40017&logNo=100100499196
| sliding menu(facebook menu style) (0) | 2012.12.20 |
|---|---|
| ListView 플리킹 더보기 구현 예제 (0) | 2012.08.20 |
| [android] Custom EventListener 만드는 방법 (0) | 2012.07.24 |
| apk tool (0) | 2012.07.20 |
| custom theme, style (0) | 2012.07.19 |
| ListView 플리킹 더보기 구현 예제 (0) | 2012.08.20 |
|---|---|
| [안드로이드] Android Custom ListView with CheckBox (0) | 2012.08.17 |
| apk tool (0) | 2012.07.20 |
| custom theme, style (0) | 2012.07.19 |
| [안드로이드] 네트워크 상태 변화 감지하기(BroadcastReceiver 사용) (0) | 2012.07.19 |
| [안드로이드] Android Custom ListView with CheckBox (0) | 2012.08.17 |
|---|---|
| [android] Custom EventListener 만드는 방법 (0) | 2012.07.24 |
| custom theme, style (0) | 2012.07.19 |
| [안드로이드] 네트워크 상태 변화 감지하기(BroadcastReceiver 사용) (0) | 2012.07.19 |
| [android] AES 이용한 암호화/복호화 예제 (0) | 2012.07.17 |
Gradient buttons for android
http://www.dibbus.com/2011/02/gradient-buttons-for-android/
Changing the Android EditText UI Widget
http://www.androidworks.com/changing-the-android-edittext-ui-widget
Create a Custom-Styled UI Slider (SeekBar)
http://www.mokasocial.com/2011/02/create-a-custom-styled-ui-slider-seekbar-in-android/
버튼들
| [android] Custom EventListener 만드는 방법 (0) | 2012.07.24 |
|---|---|
| apk tool (0) | 2012.07.20 |
| [안드로이드] 네트워크 상태 변화 감지하기(BroadcastReceiver 사용) (0) | 2012.07.19 |
| [android] AES 이용한 암호화/복호화 예제 (0) | 2012.07.17 |
| [TabHost] 선택된 탭의 이미지 처리 (0) | 2012.07.13 |
| apk tool (0) | 2012.07.20 |
|---|---|
| custom theme, style (0) | 2012.07.19 |
| [android] AES 이용한 암호화/복호화 예제 (0) | 2012.07.17 |
| [TabHost] 선택된 탭의 이미지 처리 (0) | 2012.07.13 |
| LayoutInflater 의 다양한 코드 (0) | 2012.07.13 |
| custom theme, style (0) | 2012.07.19 |
|---|---|
| [안드로이드] 네트워크 상태 변화 감지하기(BroadcastReceiver 사용) (0) | 2012.07.19 |
| [TabHost] 선택된 탭의 이미지 처리 (0) | 2012.07.13 |
| LayoutInflater 의 다양한 코드 (0) | 2012.07.13 |
| Android Layout별 속성 정리 (0) | 2012.07.11 |
1. java
package com.ahikuya;

import android.app.TabActivity;
import android.content.Intent;
import android.os.Bundle;
import android.widget.ImageView;
import android.widget.TabHost;
import android.widget.TabHost.OnTabChangeListener;

public class LayoutTab extends TabActivity implements OnTabChangeListener
{
	/** Called when the activity is first created. */
	TabHost tabHost;
	Intent It;
	ImageView iv;

	int aTabIcon[]  = {R.drawable.tabhost_home,R.drawable.tabhost_around,R.drawable.tabhost_premium,R.drawable.tabhost_my,R.drawable.tabhost_set};
	int aTabOver[] = {R.drawable.tabhost_home_ov,R.drawable.tabhost_around_ov,R.drawable.tabhost_premium_ov,R.drawable.tabhost_my_ov,R.drawable.tabhost_set_ov};
	int aTabText[] = {R.string.tab1_title,R.string.tab2_title,R.string.tab3_title,R.string.tab4_title,R.string.tab5_title};
	String aTabSpec[] = {"Tab01","Tab02","Tab03","Tab04","Tab05"};

	@Override
	public void onCreate(Bundle savedInstanceState)
	{
		super.onCreate(savedInstanceState);
		setContentView(R.layout.layout_tab);

		tabHost = getTabHost();

		for(int i = 0; i < 5; i++)
		{
			switch(i)
			{
				case 0:
					It = new Intent(this, tab1Activity.class);
					break;
				case 1:
					It = new Intent(this, tab2Activity.class);
					break;
				case 2:
					It = new Intent(this, tab3Activity.class);
					break;
				case 3:
					It = new Intent(this, tab4Activity.class);
					break;
				case 4:
					It = new Intent(this, tab5Activity.class);
					break;
			}

			// tabHost 생성
			tabHost.addTab(
			tabHost.newTabSpec(aTabSpec[i])
			.setIndicator(getResources().getString(aTabText[i]), getResources().getDrawable(aTabIcon[i]))
			.setContent(It)
			);

			// TabHost 높이
			tabHost.getTabWidget().getChildAt(i).getLayoutParams().height = 100;
			// TabHost 배경
			tabHost.getTabWidget().getChildAt(i).setBackgroundResource(R.drawable.tabhost_bg);
		}

		// debug Tab
		tabHost.setCurrentTab(0);
		// Look at Tab Change
		tabHost.setOnTabChangedListener(this);
	}

	// 선택된 Tab에 대한 처리
	@Override
	public void onTabChanged(String tabId )
	{
		/**
		* debug
		String strTabName;
		strTabName = "onTabChanged : " + tabId;
		Toast.makeText(this, strTabName, 1000).show();
		*/

		 // 이미지 초기화
		 for(int i = 0; i < tabHost.getTabWidget().getChildCount(); i++)
		 {
			iv = (ImageView) tabHost.getTabWidget().getChildAt(i).findViewById(android.R.id.icon);
			iv.setImageDrawable(getResources().getDrawable(aTabIcon[i]));

			/**
			* 배경색 초기화
			tabHost.getTabWidget().getChildAt(i).setBackgroundColor(R.color.black);
			*/
		}


		//선택된 탭의 스타일 처리
		for(int i = 0; i < aTabSpec.length; i++)
		{
			if(aTabSpec[i] == tabId)
			{
				iv = (ImageView) tabHost.getTabWidget().getChildAt(tabHost.getCurrentTab()).findViewById(android.R.id.icon);
				iv.setImageDrawable(getResources().getDrawable(aTabOver[i]));

				/**
				* 글자색 변경
				TextView tv = (TextView) tabHost.getTabWidget().getChildAt(0).findViewById(android.R.id.title);
				tv.setTextColor(Color.parseColor("#000000"));
				*/

				/**
				* 배경색 변경
				tabHost.getTabWidget().getChildAt(i).setBackgroundColor(Color.parseColor("#000011"));
				*/
				break;
			}
		}
	}
}
2. xml
| [안드로이드] 네트워크 상태 변화 감지하기(BroadcastReceiver 사용) (0) | 2012.07.19 |
|---|---|
| [android] AES 이용한 암호화/복호화 예제 (0) | 2012.07.17 |
| LayoutInflater 의 다양한 코드 (0) | 2012.07.13 |
| Android Layout별 속성 정리 (0) | 2012.07.11 |
| 안드로이드 기기별 해상도 & 치수 (0) | 2012.07.11 |
LayoutInflater 이란 놈은 xml 문서의 리소스를 받아 객체를 생성해주는 역할을 수행한다.
xml 리소스를 받는 대부분의 안드로이드 API 메서드들의 내용을 보자면 LayoutInflater 를 통해서 xml 리소스를 활용할것이다.
xml 과 연계한 커스텀뷰를 만들고자 하면 빠짐없이 등장할 클래스이며,
LayoutInflater 를 활용하는 레퍼런스 코드가 몇가지 있는데, 코드가 다르다해서 기능 또한 다르지는 않으니 모두 봐두는것이 좋겠다.
입맛대로 골라쓰면 되것지.
1. getSystemService 메서드
Activity 클래스 안에서.. {
LayoutInflater inflater = (LayoutInflater)getSystemService(Context.LAYOUT_INFLATER_SERVICE);
LinearLayout linear = (LinearLayout)inflater.inflate( xml리소스 , null );
setContentView(linear);
}
2. LayoutInflater 의 정적메서드
Activity 클래스 안에서.. {
LayoutInflater inflater = LayoutInflater.from(this); // this => Context 타입
LinearLayout linear = (LinearLayout)inflater.inflate( xml리소스 , null );
setContentView(linear);
}
3. View 의 정적 메서드
Activity 클래스 안에서.. {
LinearLayout linear = (LinearLayout)View.inflate(this, xml리소스 , null ); // this => Context 타입
setContentView(linear);
}
※ 공통 : inflate 메서드의 마지막 인자 null 은 루트View가 이미 존재한다면 그 뷰를 넣어주면 되는것이고, 없으면 null 넣어주면 됨.
원문 : http://manhdh.blog.me/120151874115
[출처] [코드] LayoutInflater 의 다양한 코드|작성자 개구리
| [android] AES 이용한 암호화/복호화 예제 (0) | 2012.07.17 |
|---|---|
| [TabHost] 선택된 탭의 이미지 처리 (0) | 2012.07.13 |
| Android Layout별 속성 정리 (0) | 2012.07.11 |
| 안드로이드 기기별 해상도 & 치수 (0) | 2012.07.11 |
| 안드로이드 시스템 아이콘 (0) | 2012.07.10 |
- Layout 기본 속성
android:layout_margin : 상하좌우 여분 공백
1. AbsoluteLayout 핵심 속성
android:layout_x : 부모 레이아웃 안에서의 x 좌표(Dimension) ex)100px
2. FrameLayout
android:foreground : 내용위에 겹쳐 그릴 표시물 자원
android:foregroundGravity : 전경 표시물의 중력
android:measureAllChildren : 레이아웃의 크기를 모든 자식을 고려해서 결정할 것인지 아니면 VISIBLE로 설정된 자식들만 고려할 것인지의 여부(true or false)
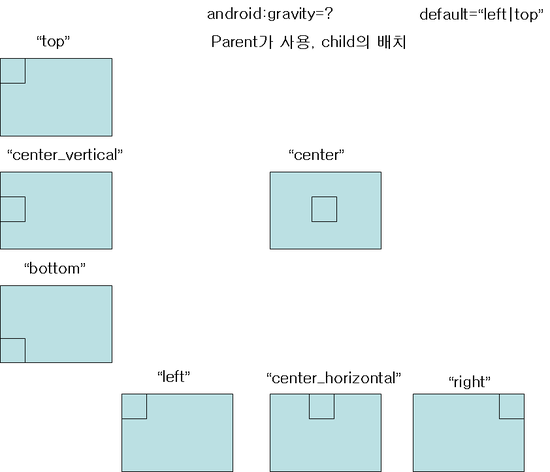
android:layout_gravity : 부모안의 자식뷰의 중력
중력 관련 값
| Constant | Value | Description |
|---|---|---|
top | 0x30 | Push object to the top of its container, not changing its size. |
bottom | 0x50 | Push object to the bottom of its container, not changing its size. |
left | 0x03 | Push object to the left of its container, not changing its size. |
right | 0x05 | Push object to the right of its container, not changing its size. |
center_vertical | 0x10 | Place object in the vertical center of its container, not changing its size. |
fill_vertical | 0x70 | Grow the vertical size of the object if needed so it completely fills its container. |
center_horizontal | 0x01 | Place object in the horizontal center of its container, not changing its size. |
fill_horizontal | 0x07 | Grow the horizontal size of the object if needed so it completely fills its container. |
center | 0x11 | Place the object in the center of its container in both the vertical and horizontal axis, not changing its size. |
fill | 0x77 | Grow the horizontal and vertical size of the object if needed so it completely fills its container. |
clip_vertical | 0x80 | Additional option that can be set to have the top and/or bottom edges of the child clipped to its container's bounds. The clip will be based on the vertical gravity: a top gravity will clip the bottom edge, a bottom gravity will clip the top edge, and neither will clip both edges. |
clip_horizontal | 0x08 | Additional option that can be set to have the left and/or right edges of the child clipped to its container's bounds. The clip will be based on the horizontal gravity: a left gravity will clip the right edge, a right gravity will clip the left edge, and neither will clip both edges. |
3. LinearLayout
android:orientation : 자식뷰들을 하나의 행(가로)으로 표시할지 열(세로)로 표시할지 결정 (horizontal, vertical)
android:gravity : 부모안의 자식뷰의 중력
android:layout_gravity : 특정 자식뷰의 중력
4. RelativeLayout
android:gravity : 부모안의 자식뷰의 중력
android:layout_alignWithParentIfMissing
android:layout_centerInParent : 부모뷰의 정중앙에 위치하도록 함(true, false)
android:layout_centerHorizontal : 부모뷰의 수평 중앙에 배치 (true, false)
android:layout_centerVertical : 부모뷰의 수직 중앙에 배치 (true, false)
android:layout_alignParentBottom : 부모뷰의 아래 위치 (true, false)
android:layout_alignParentLeft : 부모뷰의 왼쪽 위치 (true, false)
android:layout_alignParentRight : 부모뷰의 오른쪽 위치 (true, false)
android:layout_alignParentTop : 부모뷰의 상단 위치 (true, false)
android:layout_above : 뷰의 하단 가장자리를 대상뷰의 상단에 붙임(@id/abc)
android:layout_below : 뷰의 상단 가장자리를 대상뷰의 하단에 붙임(@id/abc)
android:layout_toLeftOf : 뷰의 오른쪽 가장자리를 대상뷰의 왼쪽에 붙임(@id/abc)
android:layout_toRightOf : 뷰의 왼쪽 가장자리를 대상뷰의 오른쪽에 붙임(@id/abc)
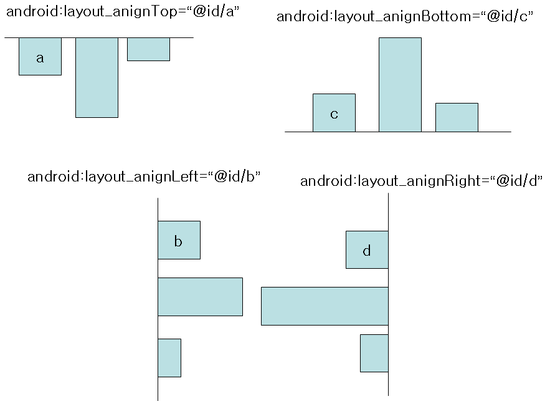
android:layout_alignTop : 뷰를 대상뷰의 상단 가장자리에 붙임(@id/abc)
android:layout_alignBottom : 뷰를 대상뷰의 하단 가장자리에 붙임(@id/abc)
android:layout_alignLeft : 뷰를 대상뷰의 왼쪽 가장자리에 붙임(@id/abc)
android:layout_alignRight : 뷰를 대상뷰의 오른쪽 가장자리에 붙임(@id/abc)
5. TableLayout
android:collapseColumns : 숨길 열들의 번호들을 쉼표로 분리해서 나열한 것(0기반)
android:shrinkColumns : 줄일 수 있는 열들의 번호들을 쉼표로 분리해서 나열한 것(0기반)
android:stretchColumns : 늘릴 수 있는 열들의 번호들을 쉼표로 분리해서 나열한 것(0기반)
android:layout_column : 이 뷰가 표시될 열 번호
android:layout_span : 이 뷰가 차지할 열들의 개수
<TableLayout
android:id="@+id/TableLayout01"
xmlns:android="http://schemas.android.com/apk/res/android"
android:layout_width="fill_parent"
android:layout_height="fill_parent"
android:stretchColumns="*" android:gravity="center_vertical">
<TableRow
android:id="@+id/TableRow01"
android:layout_width="fill_parent"
android:layout_height="fill_parent">
<Button
android:id="@+id/Button01"
android:text="1"></Button>
<Button
android:id="@+id/Button02"
android:text="2"></Button>
<Button
android:id="@+id/Button03"
android:text="3"></Button>
</TableRow>
<TableRow
android:id="@+id/TableRow02"
android:layout_height="wrap_content"
android:layout_width="fill_parent">
<Button
android:id="@+id/Button04"
android:text="4"></Button>
<Button
android:id="@+id/Button05"
android:text="5"></Button>
<Button
android:id="@+id/Button06"
android:text="6"></Button>
</TableRow>
<TableRow
android:id="@+id/TableRow02"
android:layout_height="wrap_content"
android:layout_width="fill_parent">
<Button
android:id="@+id/Button07"
android:text="7"></Button>
<Button
android:id="@+id/Button08"
android:text="8"></Button>
<Button
android:id="@+id/Button09"
android:text="9"></Button>
</TableRow>
<TableRow
android:id="@+id/TableRow02"
android:layout_height="wrap_content"
android:layout_width="fill_parent">
<Button
android:id="@+id/Button00"
android:text="0"
android:layout_column="1"></Button>
</TableRow>
</TableLayout>
출처 : http://blog.naver.com/dong277?Redirect=Log&logNo=130082743196
[출처] Android Layout별 속성 정리|작성자 동동
| [TabHost] 선택된 탭의 이미지 처리 (0) | 2012.07.13 |
|---|---|
| LayoutInflater 의 다양한 코드 (0) | 2012.07.13 |
| 안드로이드 기기별 해상도 & 치수 (0) | 2012.07.11 |
| 안드로이드 시스템 아이콘 (0) | 2012.07.10 |
| 안드로이드 라이브러리 (0) | 2012.07.10 |